

Projects Hub, lesson 20 of 34
Building Electronics Dice with LCD Display
Introduction
Imagine having a dice that you can roll electronically, with the outcome displayed on a sleek LCD screen. This exciting project combines the world of electronics and gaming, offering an engaging way to learn about Arduino programming and digital displays. In this article, we'll walk you through the creation of an electronic dice with an LCD display, exploring the working principle, the components you'll need, the circuit diagram, Arduino programming, and concluding with some thoughts on this creative endeavor.
Working Principle
The electronics dice with an LCD display is based on the principle of random number generation. It utilizes the Arduino microcontroller to generate a random number between 1 and 6, just like rolling a traditional six-sided dice. The generated number is then displayed on the LCD screen, simulating the result of the dice roll.
Things We Need
- Arduino Uno
- 16x2 LCD display with an I2C module
- Breadboard and jumper wires
- Push-button switch
- Resistor 220Ω
Circuit Diagram
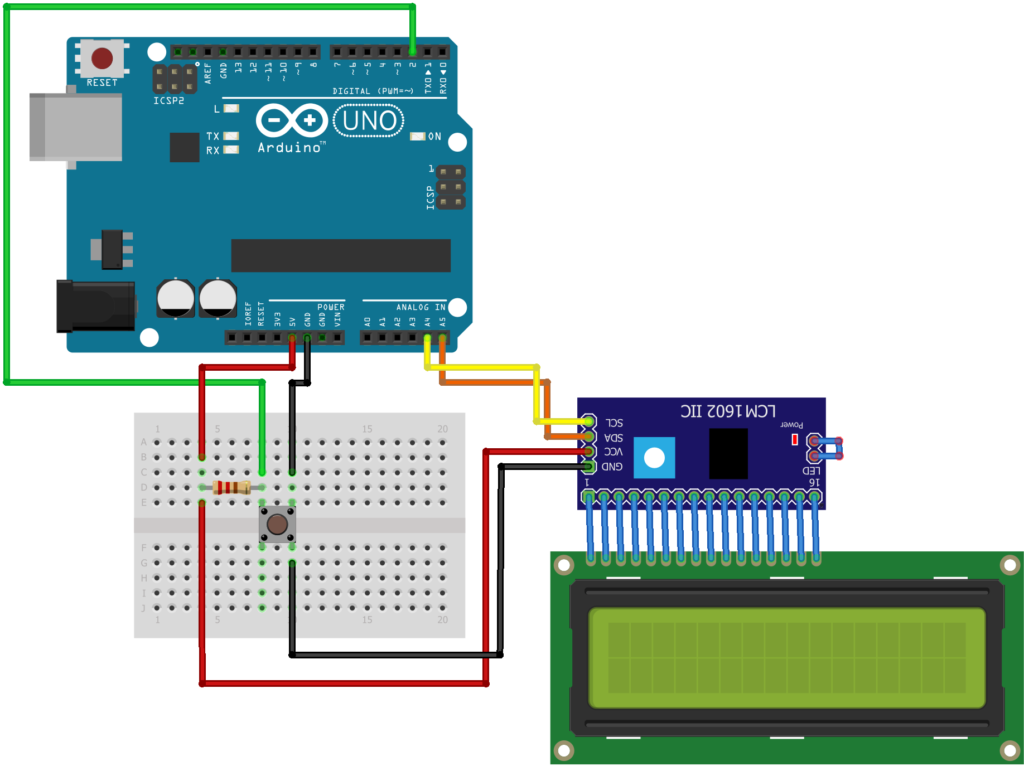
Working of the System with Arduino
- Connect the LCD to your Arduino as per the circuit diagram, ensuring that the contrast is set appropriately using the pot placed behind the I2C module.
- Add the push-button switch to the circuit. Connect one end to a digital pin on your Arduino (e.g., Pin 2) and the other end to ground. Include a 10kΩ pull-up resistor between the pin and 5V.
- In your Arduino code, initialize the LCD display and set up the button as an input.
- Use Arduino's random() function to generate a random number between 1 and 6 when the button is pressed.
- Display the generated number on the LCD screen.
Code
#include <Wire.h>
#include <LiquidCrystal_I2C.h>

LiquidCrystal_I2C lcd(0x27, 16, 2);  // Change the address (0x27) to match your I2C module
int buttonPin = 2; // Button pin
int diceResult = 0;

void setup() {
  lcd.init(); // Initialize the LCD
  lcd.backlight(); // Turn on the backlight
  pinMode(buttonPin, INPUT_PULLUP); // Set the button pin as input with pull-up resistor
  randomSeed(analogRead(0)); // Seed the random number generator
}

void loop() {
  if (digitalRead(buttonPin) == LOW) {
    diceResult = random(1, 7); // Generate a random number between 1 and 6
    lcd.clear(); // Clear the LCD
    lcd.setCursor(0, 0); // Set cursor to first row
    lcd.print("Dice Roll: ");
    lcd.setCursor(0, 1); // Set cursor to the second row
    lcd.print(diceResult); // Display the result
    delay(1000); // Delay to prevent multiple rolls with one button press
  }
}
Conclusion
Creating an electronics dice with an LCD display is a fantastic project for both beginners and experienced electronics enthusiasts. It combines hardware components, Arduino programming, and a bit of creativity to produce an interactive and entertaining device. This project can serve as a gateway to further exploration of Arduino-based gadgets and gaming applications. So, gather your components, follow the instructions, and roll your way into the world of electronic dice gaming!