

Projects Hub, lesson 33 of 34
Distance Measurement and Stepper Motor Control with LCD Output
Introduction
Distance measurement is essential in various applications, from robotics and automation to security systems and healthcare devices. Stepper motors are precise and versatile actuators used in many projects. This article explores a project that combines these two elements to create a system capable of measuring distance and controlling a stepper motor, with real-time feedback displayed on an LCD screen using I2C communication. We'll use an Arduino to accomplish this, making it accessible to hobbyists and electronics enthusiasts.
Working Principle
The core concept behind this project is using an ultrasonic distance sensor to measure the distance to an object and then using the Arduino to process this data. Based on the measured distance, the Arduino will control a stepper motor's rotation through a ULN2003 driver. An I2C LCD screen will display real-time distance data, providing visual feedback.
Things We Need
To build this project, you'll need the following components:
- Arduino Uno or similar microcontroller
- Ultrasonic distance sensor (e.g., HC-SR04)
- Stepper motor 28BYJ-48 and ULN2003 motor driver IC
- 16x2 LCD display with I2C Module
- Breadboard and jumper wires
- Power supply for the stepper motor (if required in cases for higher consumption Motors)
- Mounting hardware and an object for distance measurement(Optional)
Circuit Diagram
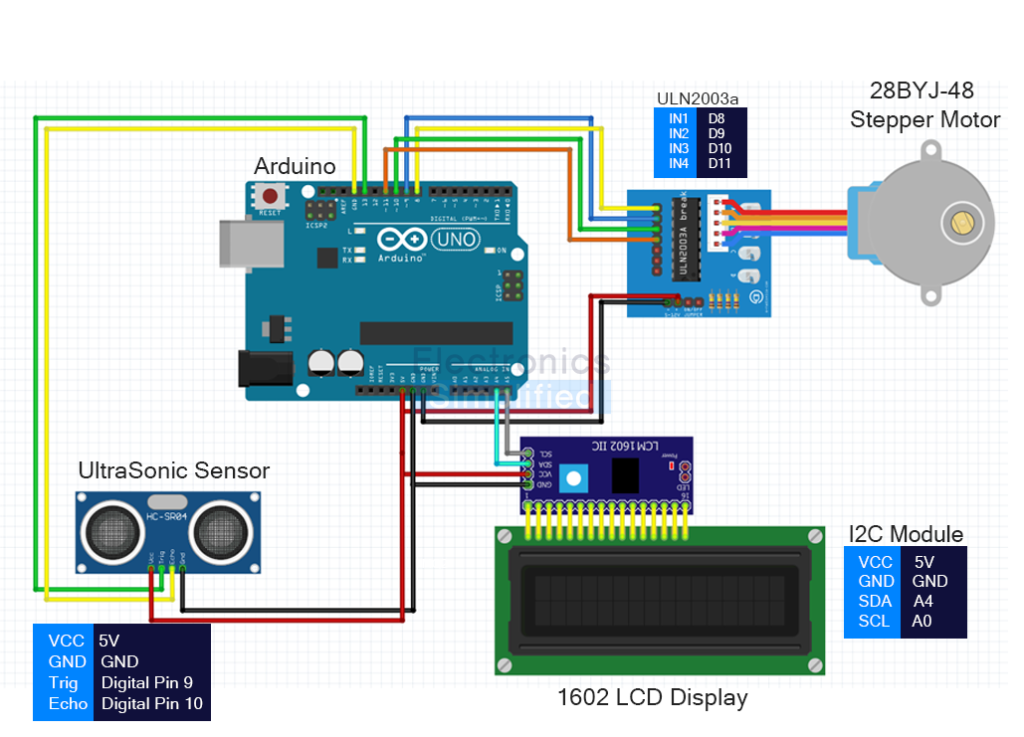
Working of the System with Arduino
- Ultrasonic Distance Measurement: The HC-SR04 ultrasonic sensor emits high-frequency sound waves and measures the time it takes for the sound waves to bounce back after hitting an object. The Arduino calculates the distance based on the time taken.
- Stepper Motor Control: The Arduino controls the stepper motor's rotation through the ULN2003 driver. Depending on the distance measured, the Arduino sends appropriate control signals to the stepper motor driver to rotate the motor clockwise or counterclockwise.
- LCD Output: Real-time distance data is displayed on the I2C 16x2 LCD screen. The Arduino communicates with the LCD using the LiquidCrystal_I2C library, making it easy to display distance values.
Code
Here is a simplified code snippet to get you started
#include <Wire.h>
#include <LiquidCrystal_I2C.h>
#include <Stepper.h>

// I2C LCD initialization
LiquidCrystal_I2C lcd(0x27, 16, 2); // Adjust the address 0x27 if needed

// Defines the number of steps per rotation
const int stepsPerRevolution = 2038;

// Creates an instance of stepper class
// Pins entered in sequence IN1-IN3-IN2-IN4 for proper step sequence
Stepper myStepper = Stepper(stepsPerRevolution, 8, 10, 9, 11);

// Ultrasonic sensor pins
const int trigPin = 12;
const int echoPin = 13;

void setup() {
    // LCD initialization
    lcd.begin();
    lcd.backlight();
    lcd.setCursor(0, 0);
    lcd.print("Distance:");

    // Ultrasonic sensor pins
    pinMode(trigPin, OUTPUT);
    pinMode(echoPin, INPUT);
}

void loop() {
    // Ultrasonic distance measurement
    long duration, distance;
    digitalWrite(trigPin, LOW);
    delayMicroseconds(2);
    digitalWrite(trigPin, HIGH);
    delayMicroseconds(10);
    digitalWrite(trigPin, LOW);
    duration = pulseIn(echoPin, HIGH);
    distance = (duration / 2) / 29.1; // Convert to centimeters

    // Display distance on LCD
    lcd.setCursor(0, 1);
    lcd.print("                "); // Clear previous data
    lcd.setCursor(0, 1);
    lcd.print(distance);
    lcd.print(" cm");

    // Control stepper motor based on distance
    if (distance < 10) {
        myStepper.setSpeed(10); // Rotate quickly
        myStepper.step(stepsPerRevolution); // Rotate CW
    } else {
        myStepper.setSpeed(5); // Rotate slowly
        myStepper.step(-stepsPerRevolution); // Rotate CCW
    }
    delay(1000); // Delay for stability
}
Conclusion
In this project, we combined an ultrasonic distance sensor, a stepper motor with a ULN2003 driver, an Arduino, and an I2C LCD display to create a system that measures distance and controls a stepper motor based on that measurement. This project is a great starting point for those interested in learning about sensors, actuators, and microcontroller programming. You can further enhance this project by adding additional features such as more precise control algorithms or integrating it into a larger system for automation or robotics.