

Projects Hub, lesson 30 of 34
How to set a Light Sensitive Motorized Blinds and LCD Feedback
Introduction
In today's world, where energy efficiency and smart home solutions are gaining traction, motorized window blinds offer a practical and efficient way to control natural lighting and maintain a comfortable indoor environment. By using a light-sensitive system, the blinds can automatically open and close based on the intensity of sunlight. Additionally, incorporating an LCD provides real-time feedback on the system's status, enhancing user interaction.
Working Principle
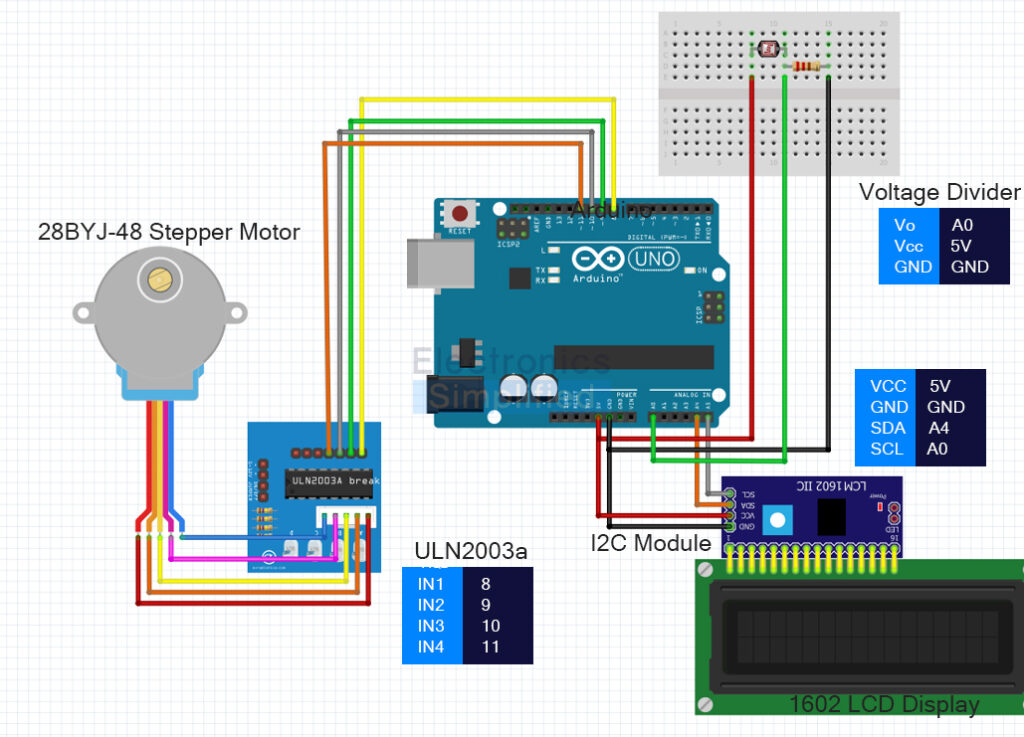
Stepper motors are ideal for precise control applications like motorized blinds. The 28BYJ-48 stepper motor, in conjunction with the ULN2003 driver, allows for accurate positioning of the blinds. A photoresistor detects the ambient light level, and an Arduino microcontroller processes this information to control the motor. The LCD displays the current state of the blinds and light intensity.
How It Works
- Light Detection: A photoresistor measures the ambient light level.
- Processing: The Arduino reads the light intensity and determines whether to open or close the blinds.
- Motor Control: The stepper motor, driven by the ULN2003 driver, adjusts the blinds' position accordingly.
- Feedback: An LCD screen displays the light intensity and the current position of the blinds.
Things You'll Need
To build this system, you'll need the following components:
- Light sensor (LDR - Light Dependent Resistor)
- 28BYJ-48 Stepper Motor
- ULN2003 Driver Board
- 10kΩ Resistor
- Arduino Uno
- LCD screen (16x2 ) with I2C Module
- Breadboard and jumper wires
- Power supply (battery or adapter)
- A set of blinds or curtains with a motorized control system
Circuit Diagram
Arduino Code
For this project, you'll need the following libraries:
Stepperlibrary: This built-in Arduino library helps control the stepper motor.LiquidCrystal_I2Clibrary: This library allows you to control the LCD display with I2C interface.
#include <Wire.h>
#include <Stepper.h>
#include <LiquidCrystal_I2C.h>

// Stepper motor setup
const int stepsPerRevolution = 2038;
Stepper myStepper(stepsPerRevolution, 8, 10, 9, 11);

// LCD setup
LiquidCrystal_I2C lcd(0x27, 16, 2);

// Photoresistor pin
const int photoPin = A0;

void setup() {
  // Initialize the stepper motor
  myStepper.setSpeed(10);

  // Initialize the LCD
  lcd.begin();
  lcd.backlight();
  lcd.print("Light Level:");

  // Set up the photoresistor pin
  pinMode(photoPin, INPUT);
}

void loop() {
  // Read the light level
  int lightLevel = analogRead(photoPin);

  // Display light level on the LCD
  lcd.setCursor(0, 1);
  lcd.print(lightLevel);

  // Control the stepper motor based on light level
  if (lightLevel < 300) {
    // Open the blinds
    myStepper.step(stepsPerRevolution / 8);  // Adjust the step count as needed
  } else if (lightLevel > 700) {
    // Close the blinds
    myStepper.step(-stepsPerRevolution / 8);  // Adjust the step count as needed
  }

  // Short delay to stabilize the reading
  delay(500);
}
Conclusion
By automating your window blinds with a light-sensitive stepper motor system, you can enhance the comfort and energy efficiency of your home. The use of an I2C LCD for real-time feedback adds a layer of interactivity and monitoring, making the system both functional and user-friendly. This project not only introduces you to the basics of working with stepper motors and sensors but also opens the door to numerous other home automation possibilities. Happy building!