

ESP32, ESP8266 & Raspberry Pi, lesson 19 of 26
Getting Started with ESP8266 WiFi Transceiver
So as we move to the modern day we are talking more about wireless systems, wireless communication and everything that operates and connects the internet. ESP8266 is a great WiFi module for IoT and Home Automation Projects. Lets dive deeper in this development board.
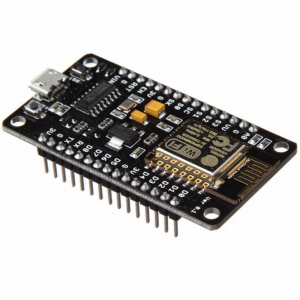 ESP-12E NodeMCU
Introduction
The ESP8266 is a low cost module and it is great for the functions it does at this low price. There are many ways to use the ESP8266, we can program it using the Arduino IDE too. This device will help you build wireless projects from your basic arduino projects.
Functions
This WiFi Module can create :
- Web Servers
- Send Hypertext requests
- Control actuators
- Read Sensors
- Send Email
This list can go on, but we need to get learning this device. Getting started might be a bit tricky, but once you get a hang if it, you will explore another world of wireless modules.
About ESP8266
There are various versions of the ESP8266. The most popular to todays date is ESP-02 and NodeMCU kit.
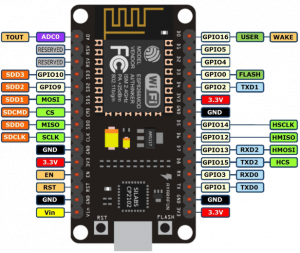
Pin Diagram NodeMCU
Installing ESP8266 Board for Arduino IDE
So we will be programming the ESP8266 with the Arduino IDE. The best part is that you do not need to learn a new language for programming the ESP8266.
Now for Windows, Linux and Mac OS you can download all the latest Arduino IDE from https://www.arduino.cc/en/Main/Software
After you complete the installation of the IDE. Follow the below instructions:
- Open the Arduino IDE
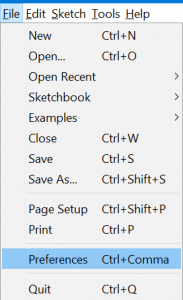
- Click on File ---> Preferences
- Enter the link http://arduino.esp8266.com/stable/package\_esp8266com\_index.json in the Additional Board Managers URL
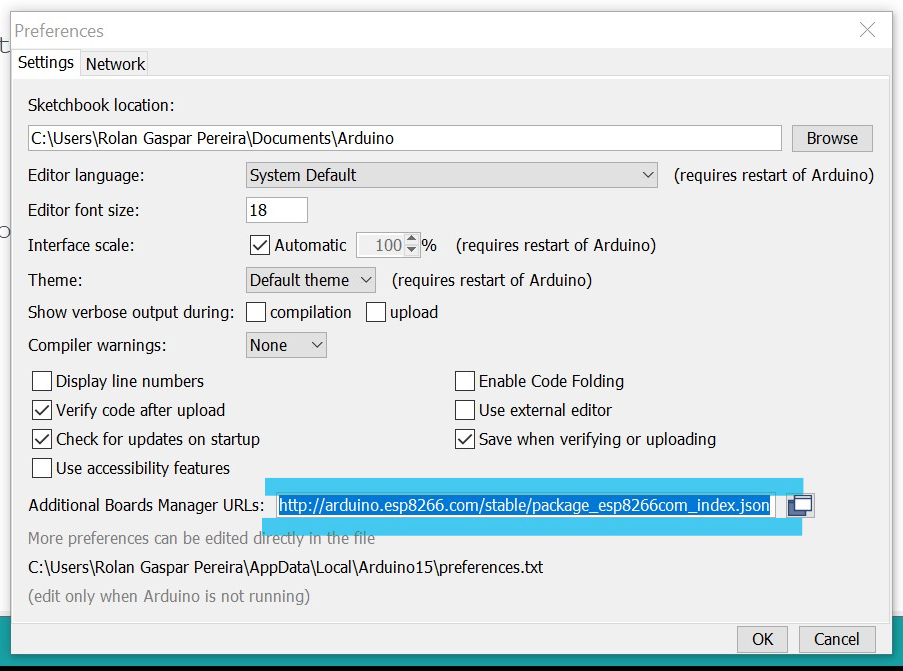
- Open the Boards Manager. Go to Tools > Board > Boards Manager
- Search for ESP8266 and press install button
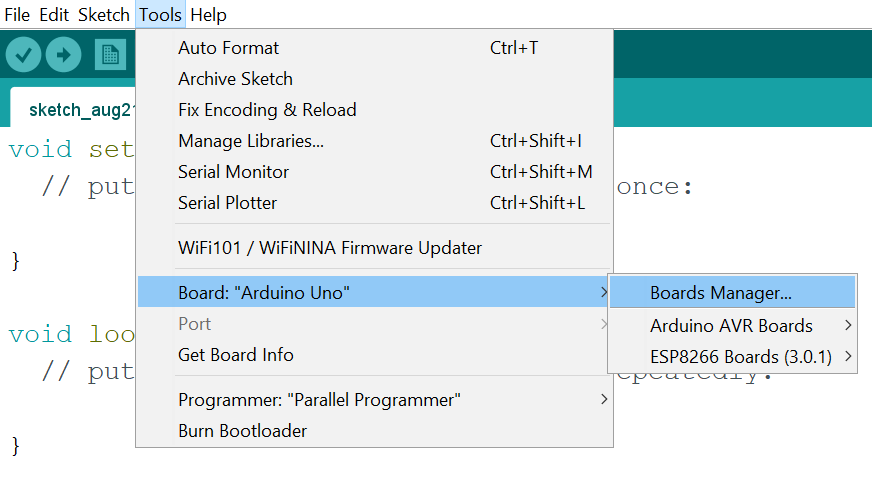
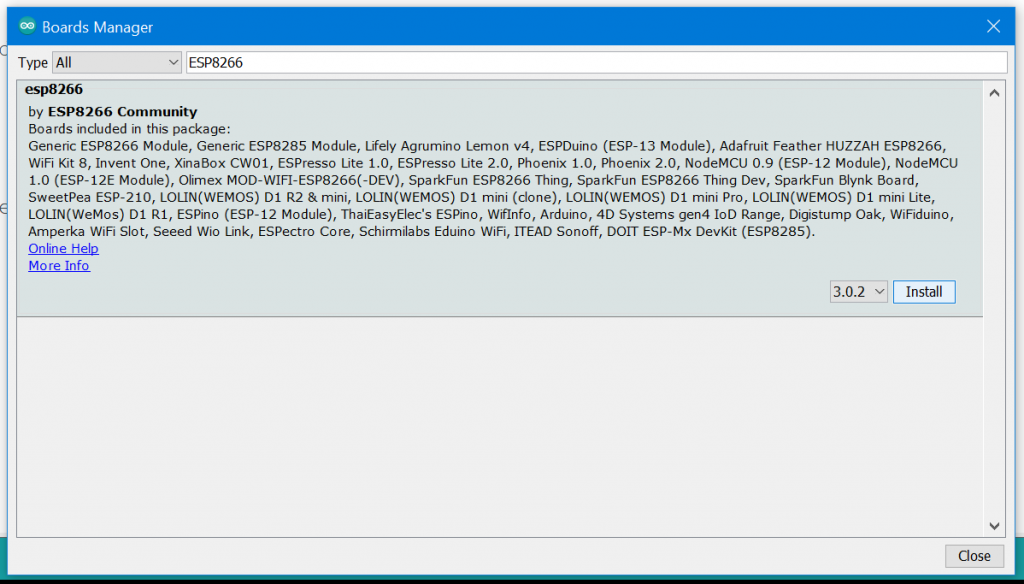
Now you have configured the Arduino IDE for the ESP8266. Please note that in order to program Arduino you will have to restore the settings in the board manger and select Arduino Uno or whichever family of Arduino that you use.
Pin Functions / How to use the multipurpose pins
17 GPIO pins are available on the ESP8266, some of the GPIOs have very specific functions and some are advisable not to use. Find the listing to check for the best pins for your project. So just a suggestion, Get your blueprint ready for your innovative project before you can start programming the ESP8266. This process will save hours of your life.
| Label on the ESP8266 | GPIO | Input | Output | Important Notes |
| D0 | GPIO16 | no interrupt | no PWM or I2C support | HIGH at boot used to wake up from deep sleep |
| D1 | GPIO5 | OK | OK | SCL |
| D2 | GPIO4 | OK | OK | SDA |
| D3 | GPIO0 | pulled up | OK | HIGH at boot connected to FLASH button, boot fails if pulled LOW |
| D4 | GPIO2 | pulled down | OK | HIGH at boot connected to on-board LED, boot fails if pulled LOW |
| D5 | GPIO14 | OK | OK | SPI (SCLK) |
| D6 | GPIO12 | OK | OK | SPI (MISO) |
| D7 | GPIO13 | OK | OK | SPI (CS) Boot fails if pulled HIGH |
| D8 | GPIO15 | pulled to GND | OK | SPI (CS) Boot fails if pulled HIGH |
| RX | GPIO3 | OK | RX | HIGH at boot |
| TX | GPIO1 | TX | OK | debug output at boot, boot fails if pulled LOW |
| A0 | ADC0 | Analog Input | X |
GPIOs - Flash Chip
GPIO6 to GPIO11 are connected to the flash chip in the ESP8266. These pins are not recommended for use. You can use them based on the notes. As long as they in do not interfere with your requirements.
Pin Status on Boot
The ESP8266 can be prevented from booting if some pins are pulled LOW or HIGH. The following list shows the state of the following pins on BOOT:
- **GPIO16:**pin is high at BOOT
- **GPIO0:**boot failure if pulled LOW
- GPIO2: pin is high on BOOT, boot failure if pulled LOW
- GPIO15: boot failure if pulled HIGH
- GPIO3: pin is high at BOOT
- GPIO1: pin is high at BOOT, boot failure if pulled LOW
- GPIO10: pin is high at BOOT
- GPIO9: pin is high at BOOT
There are certain pins that output a 3.3V signal when the ESP8266 boots. This may be problematic if you have relays or other peripherals connected to those GPIOs. All the pins marked in yellow are HIGH.
GPIO4 and GPIO5 are the most safe to use GPIOs if you want to operate relays.
So these are a few notes you may keep in mind before we start programming. We will start with our first program in the next chapter. The other important notes will follow as we program the ESP8266.